Hello Freinds,
in this post we will learn about, how to create a website with help of themes, plug ins, Images, Video, Pages, Post and Menu which will make your website very functioning, attractive, beautiful and professional.
Before we move ahead, we should know some critical parts of a website, without which website can not be created along with it, we will see some requirements to make your website creative, attractive and beautiful. let’s have a brief look to the below list.
- Plafeform
- Domain & Hosting
- Theme
- Plug-in
- Page & Post or Blog
- Images & Videos
- Menu
How to create a Website
Lets look at all above listed component one by one with which you can build a complete website.
Website Platform
There are many platforms available in the market on which, you can build your website. But the famous platforms are Drupal, Zumla and WordPress.
Out of all above, WordPress is the famous, trusted by millions of peoples and very demanding platform to build a website this time, due to its user friendliness and unlimited customization options.
Where Drupal & Zumla has very limited options, which creates difficulties for a website designer sometimes.

In details, there are another two variant of wordpress. 1) WordPress.com & 2) WordPress.org
When you build a website on wordpress.com, there will be no any control of website in your hand and your website can be closed if you break any policy.
WordPress.org has benefit over this, as you can have complete control of your website on your hand as this is open source platform, but here it is to be noted that, the complete responsibility is also yours for your website operations.
Domain
Once you have decided with the platform, now its time to move ahead to next step, where you have to chose domain and Purchase a hosting plan.
If you are not aware on What is domain and Hosting, just visit the blog by clicking here, you will get an idea about domain and hosting.
Its advisable that you visit this article, before Purchasing domain & hosting, as it will help you to get prepared for chose the best plan.
As you aware from above article, that domain is the name of your website which will be guiding to visitors to reach to the destination of your website.
Generally, people chose domain names as per their interest, experience, brand name, personal name, company name etc.
The below is a video made specifically on “how to chose a domain name” please have a look at it.
Once you have chosen a domain name, now its time to purchase a domain name.
In general there are so many domain providers available in the market, but suggesting to purchase from a trusted one only.
As shared in earlier article, in domain name there is two parts, first is child and second is parent component. From the above video you can chose child component easily, but for parent components, you have to read below.
Parent component is also called as a domain extension, do you know there are total 280 number of domain extensions are available in the market, you need to chose the best out of it, but still its not so much difficult task, let’s see how.
All domain names can not be write here, so some of popular domains written below.
- .net
- .online
- .technical
- .in
- .org
- .edu
- .tech
The most used and popular domains are .com and .in which is very famous and trustworthy domains in the market this time, all hosting and domain providers can serve you this domain extension in combination with parent component to build your domain name.
You can see around, brand companies websites, has most commonly .in or .com as their extension in domain name, as it is believed most trustworthy and reliable domain extension out of all domains.
Hosting
As we knew in earlier blogs that, Hosting is a specific space area provided on a server by Hosting provider to the website owner to perform various operations on the website.
Different Hosting providers has multiple plans basis on their policy and market requirements. Basically famous hosting plans are, Shared Hosting, VPS Hosting, Dedicated hosting and Cloud Hosting.
In earlier blogs we learn about different hosting types and their function. In this blog, we are taking one hosting plan to make you aware on “how to purchase hosting”
Here we will take an example of hosting provider – GreenGeeks, which is trusted by many Digital Marketer as well as Website designers and developers..
Let’s see the step by step process to purchase hosting.
1. Just click on this link – GreenGeeks® | Fast, Secure and Eco-friendly Hosting
2. You will see this page section after clicking on above link.
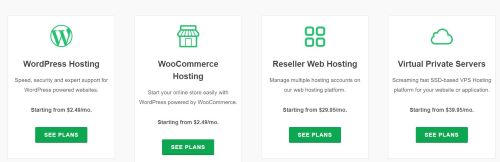
Here, you can select the plan which suits you the best, if you are just at the initial stage and your business is also at small to moderate level, suggesting to chose WordPress hosting, which is like a shared hosting.
Here Green geek hosting provider has called Shared hosting as a WordPress hosting, but it is the same as we learnt earlier in shared hosting.
Once you have chosen a plan, you can Click on “SEE PLANS” as per plan you have selected. Here, WordPress hosting is selected because of its popularity and demand this time.
3. The next page after plan selection, will be per below.

As per image shown there will be details plans now, with its features and various options which is required little knowledge about the hosting.
Still, prefers to chose the lite plan if you are at a small stage or you want to create a basic website.
Later on, you can switch over to other higher plans to if you need to upgrade to the plans looking to your increasing business profile.
If you are not aware about the various features of plans here, lest have a brief look on each one which are essential to know.
- One Website – This indicates the number of website which you can host with single hosting plan.
- Web Space – It is the size of total storage provided per plan.
- Data Transfer – Its shows the data transfer limitation.
- E-Mail Accounts – It indicates the Number of E mail accounts, let say, if you are a company owner having staff of 10 peoples, so you can provide each person an individual E mail account as per their function or you can divide it department wise too, like, marketing, production, assembly, purchase, administration etc.
- Performance – It relates to the performance speed of the website.
- SSL Certificate – With this certificate your site will be secured from any Hacking or Spam activity, some times you have to purchase it with extra cost.
- Domain Name – It is already discussed in earlier blogs.
- Nightly back up – It is the back up used to recover the files deleted accidenlty.
- CDN – Content Delivery Network – It is the Group of server which works together to maker your content delivery faster.
- WordPress – It has been covered in top section of this blog.
Once you have clear idea on detailed plans and their features and facilities provided by the hosting provider, you can click on “GET STARTED”
4. Here you will landed on next page, where you will get the below interface.
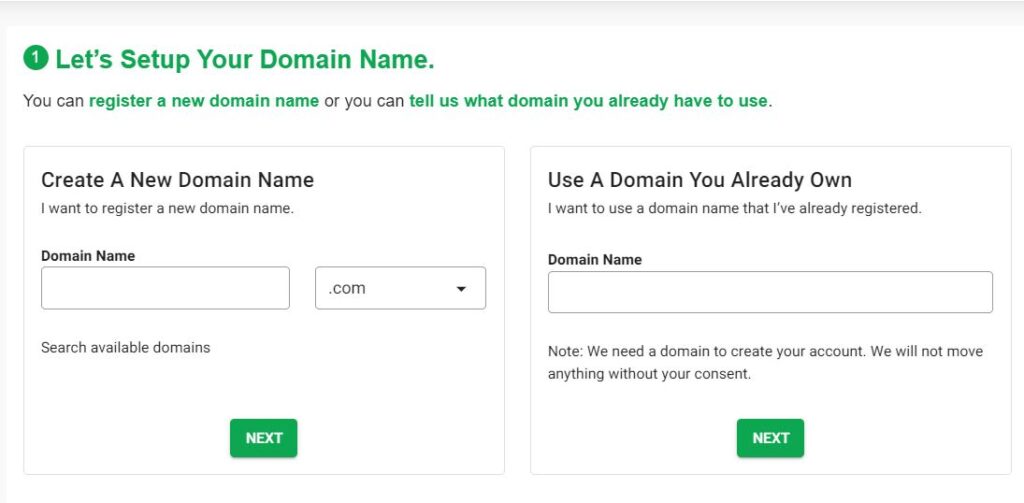
Here, you will be asked to fill up your domain name with two different options per below.
- If you want to create a website from scratch, then you need to fill up your New Domain name at Left side.
- If you have already a website and want to switch over the hosting provider, you need to fill up your existing domain name at Right side and then press NEXT.
5. After pressing NEXT, below Page will be opened with different sections like, Personal information, Package information and Payment details.
Personal Information
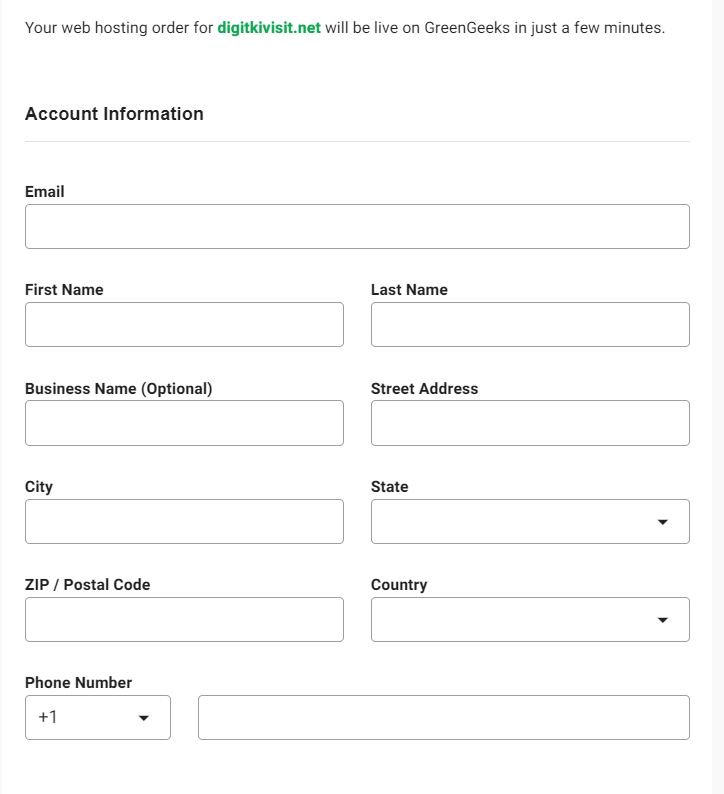
In this section you will need to fill up details like Name, Email, Address and phone number which will be required to create your account at GreenGeeks.
This information will be used by GreenGeeks to send Email about updates, offers or alerts time to time, there you can unsubscribe, if you don’t want it.
Package Information
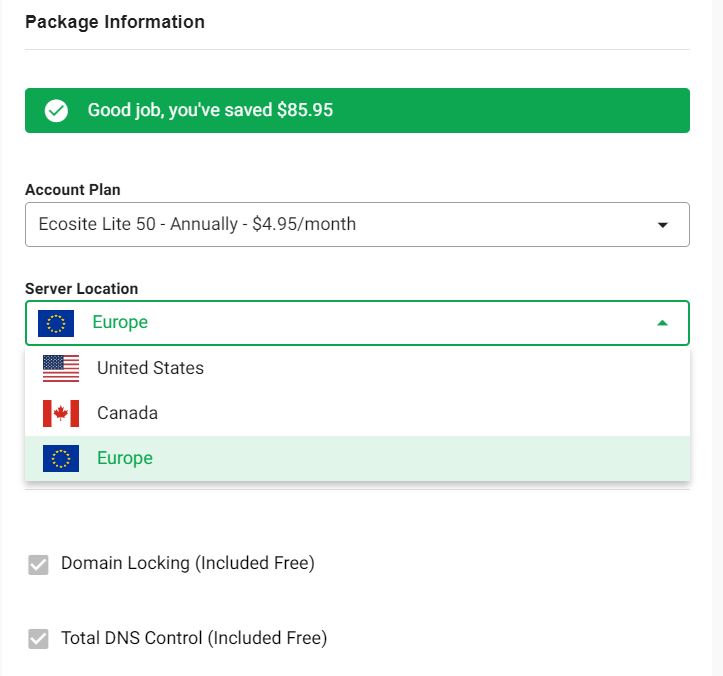
In this section, you will need to chose the best plan to buy, from options like, monthly, quarterly or annually.
Also, you can change the hosting server location here, depending on the country you live in. It is very much important to chose the correct server so you can maximum traffic from your country as server location will be near to your country.
If you missed out this stage here, you have to write support team of GreenGeeks, if you need to change the location of server. They will change the location as per your request in 24 hrs time.
Payment Details
Here, in this section, you can finally pay through your credit card / debit card and book a space on their server, depending on your plan, they will share you your log in credentials on the mail which you have provided at the time of personal detail filling.
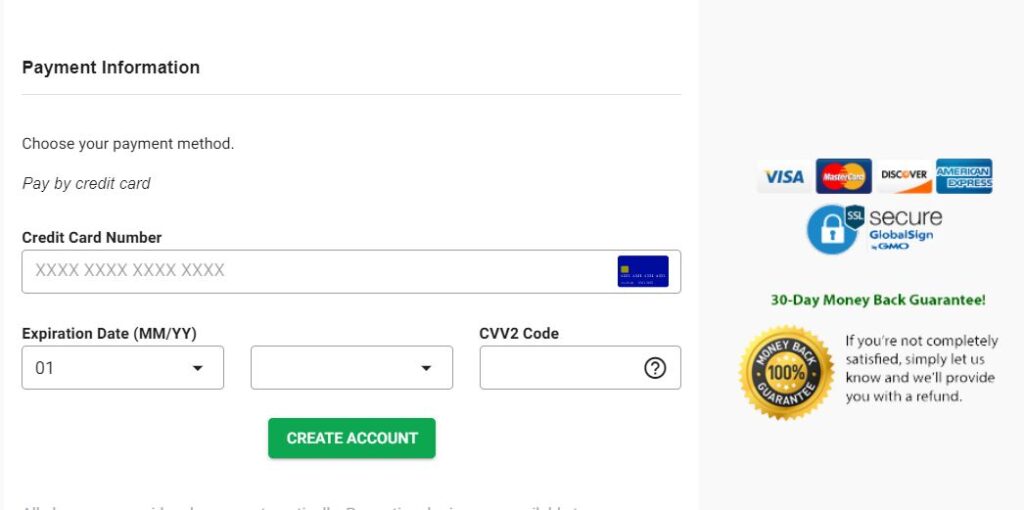
Save this information, as this mail will contain your customer ID too, which will be needed in case you contact their support team for any query or problem.
Here one good thing to be noted it their money back guarantee, which allows you to take your money back if you find this hosting not useful or you are unhappy due to any reason within time period of 30 days.
Once you done with all above things, you can log in to your account with the details provided in welcome Email from GreenGeeks.
Once you log in you can install WordPress, on your website and make your site secure with the help of SSL certificate.
If you don’t know how to install WordPress you can chat with their executive LIVE for step by step guide on how to install WordPress and how to activate SSL certificate on your site.
Or, it may cover in upcoming blog, specifically on how to install WordPress or how to activate SSL Certificate and then how to log in to your website dashboard for real working on site.
Once done all above steps, you can go to your website by typing URL in the address bar on top of your Computer.
Theme
After installing WordPress on your site, next part is THEME, which decide how your website colours & structure will be.
Theme decides how your website will look.
In Market, there are so many themes available but the most popular themes are Generate Press, Astra, Woocommerce, WP Ocean etc.
Today, most of digital marketers and website designers are using Generate Press theme, due to its various options, low size and mobile compatibility features.
All theme have two versions. 1) Free Version & 2) Paid Version.
Free version is provided to practice with the theme, once you are familiar with all functionality of theme, you can chose the paid version where you can explore more features.
To install any theme on your website, you need to follow below step.
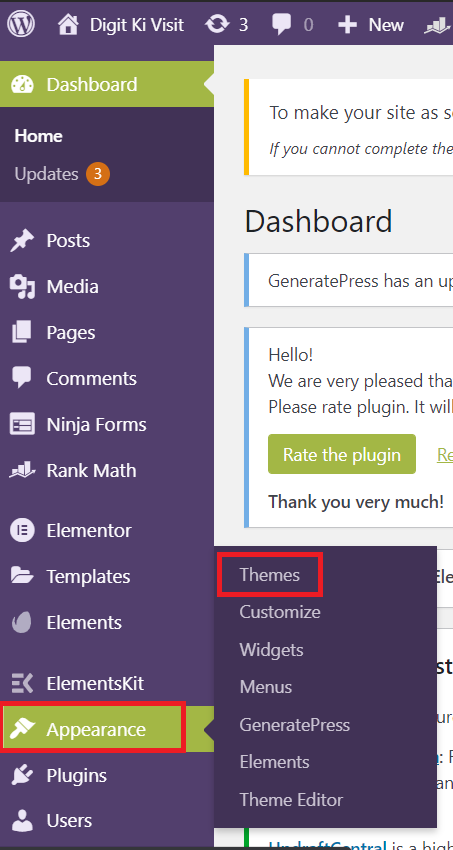
When you logged in to your dashboard of website, you will see below interface, where you can install theme.
You need to follow below step as per shown in images
When you logged in to your dashboard, you can see the interface like shown in this image.
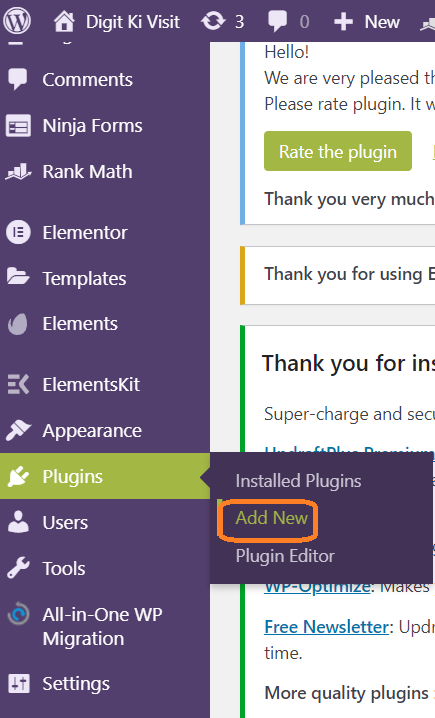
To Install a theme you have to click on Appearance and then Theme as shown in below image.
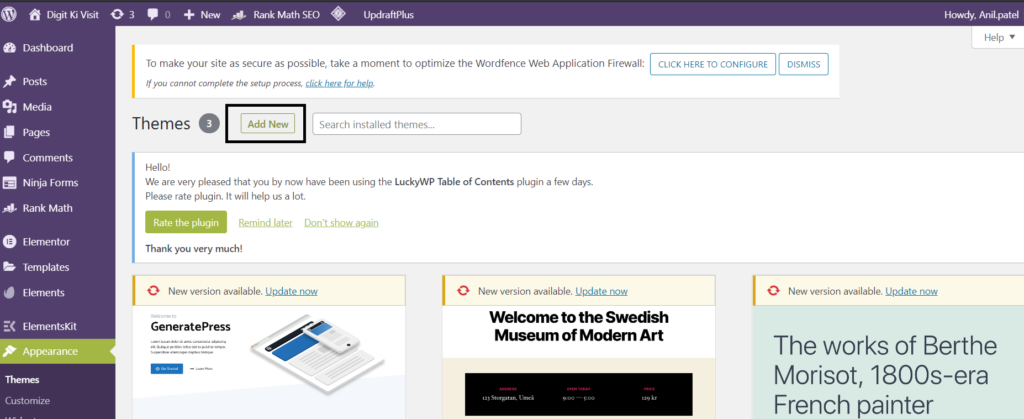
Once you click on theme you will be redirect to the page as per below, where you can press Add New to upload a new theme.
Once you press Add new, you will be redirect to the page as per shown in image.
This will open next option and allow you to search for theme which you want to install on your site.
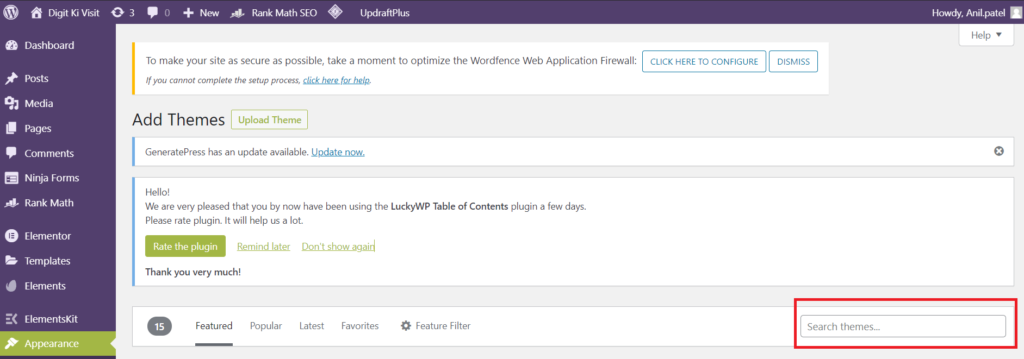
Here in this box, you can type the theme name you want to install on your site. It will search your theme and from there you can see preview of theme (how your website will look after installing theme) or directly install by pressing install and then activate button.
Note, if you have already installed theme on your website and you are intend to install another theme, you can repeat the same process, with this, the Latest theme will be activated and Old theme will be automatically deactivated from your website.
After installation of theme you need to update it time to time whenever you get notification on your dashboard, to be updated with the changes.
Plug-ins
Plug ins are the set of ready made designed programmes which will enhance the functionality of your website, it just like a electric plug which you need to insert in socket to turn on an electrical appliance.
For different kind of purpose, there are many plug ins available in the market, they are also Free and paid too, you can decide which option you need to chose as per your requirements.
Plug ins can be Installed as the same process as like theme, from the dashboard, here only you don’t need to click on appearance but you need to click on plug-ins only.
Suggesting below plug ins to install first to make your website secure and fully operative.
- Wordfence – to make is secure from any cyber hack.
- Updraft plus – to take a back up of your website time to time.
- Akismet – to prevent spam comments on your website.
- Ninja Forms – to create contact us pages.
- Elementor – to create beautiful pages.
There are plenty of plug ins available in the market, you need to explore them one by one as per your requirement, only thing to be noted is when you install plug in, check for its number of active installation as well as compatibility to WordPress version, these will be shown at the time when you search for plug in and they appears on your screen.
Upcoming blogs may cover most popular plug ins with their functions and features of operation with different kind of settings.
Page & Post or Blog
Basically Page and post are almost same with little difference which you might not get clearly at the beginning stage, but once you build more websites and more and more blogs or post, you can differentiate it very easily.
Pages are like a different pages in the book but post or blogs are the things which are written separately and that are part of pages or may not be the part of pages.
Pages are made just to provide or to collect information from the visitor, i.e. contact us page, about us page.
You can put your post inside the page, but its reverse is not advisable or merely not possible too.
Below is the video where you will be able to make difference between page and post very easily with the help of creative example.
Here it is being tried to make you aware on the basic difference between Page & Post, hope you will like it and share to the maximum persons who can get benefits from it.
Once we aware about it, we can easily create page and post in the same manner. Let us see how we can create Page and Post.
To create a page or Post you have to go to dash board and then click on Post or Pages as per your requirement.
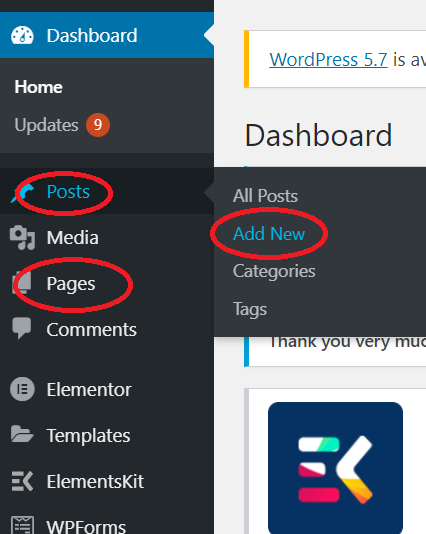
Here at the dashboard left side you can see Post and Pages option where you need to click as per your requirement, if you want to add post then click on post and if you want to add page, you can click on page.
After if click on add new, in case you have already created earlier ones, you can edit it by clicking on all Post or all Pages as per your requirement.
Once you click on add New, you can see the below interface, where you can give a title of your page or post and then publish it.
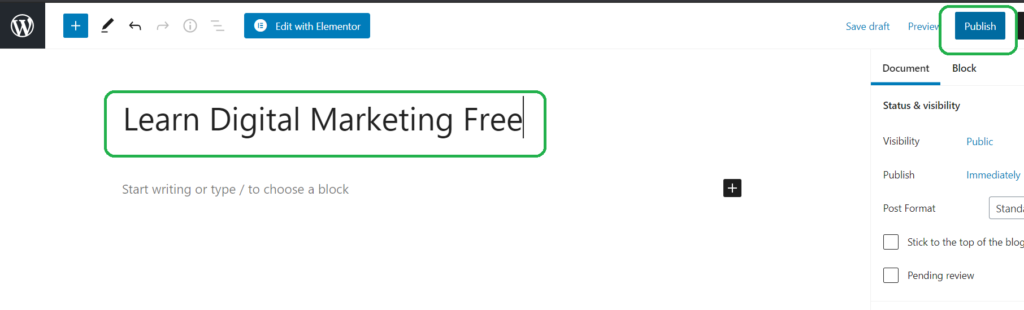
Here our title is “Learn Digital Marketing Free” which is covered by a box to make you visualize easily.
If you want to learn more how to create a beautiful & attractive Post in WordPress, you can CLICK HERE.
Images & Videos
These are crucial part of your website, without which your website will not look pretty and images can speak so many word without mouth or tongue.
In this website also, you can see various images has been used to make you understand the complete process.
No one can read long and long paragraphs or texts without getting tired or bored, as it is a typical human nature and its controlled by human brain.
We can add image or video to make our website interesting and can improve engagement of visitors to our website.
There are 2 ways to add images and video on website. 1. From the Library & 2. From the Post or Page Section.
You can add image and video easily in Post or Page, hence we will see here how you can add images or videos directly in Library so you can easily upload images and videos on your website.
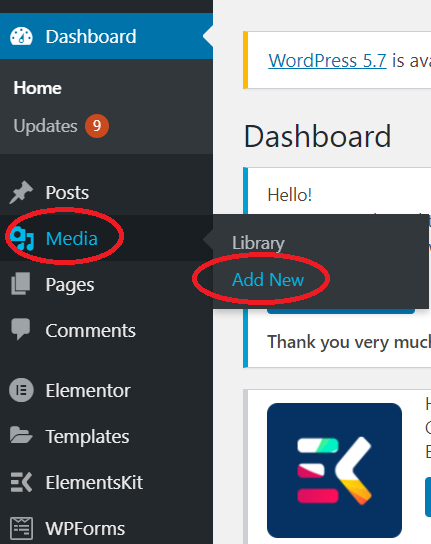
Just go to dashboard, click on media, and then click on add new, if you want to see the gallery, you can click on Library.
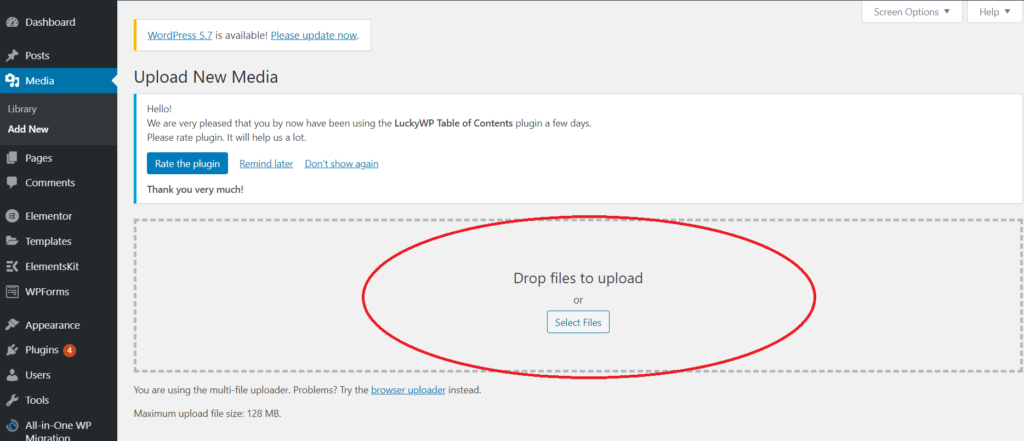
Here you can add new image or video by just selecting files from your Computer.
Here only, one thing is to be noted that, you can not upload a image or video more than 128MB single file or total size.
The benefit of uploading files such a way is it can save your time to upload each and every image or video as and when required, you can upload one time and insert it on your website when ever you need to use.
Menu
This is the last section of basic website design, after which we can find our website operative.
It is the list of list of your blogs, articles, pages or products which are put at the home page or on each page of website so that visitor can be navigate easily on your website.
It is just like a Menu of Restaurant or Hotel where all the dishes or items put together which are being served and you can chose any of them very easily.
With the help of Menu, a visitor can easily navigate on your website, and browse through different sections or pages on your website.
Typically, Menu is kept on top of website on home page or on all pages so visitor can see it easily.
You can decide on which page menu is to be displayed. Let us see how we can build a menu on website.
As shown in below image, go to Appearance and then Menu, and click on Menu.
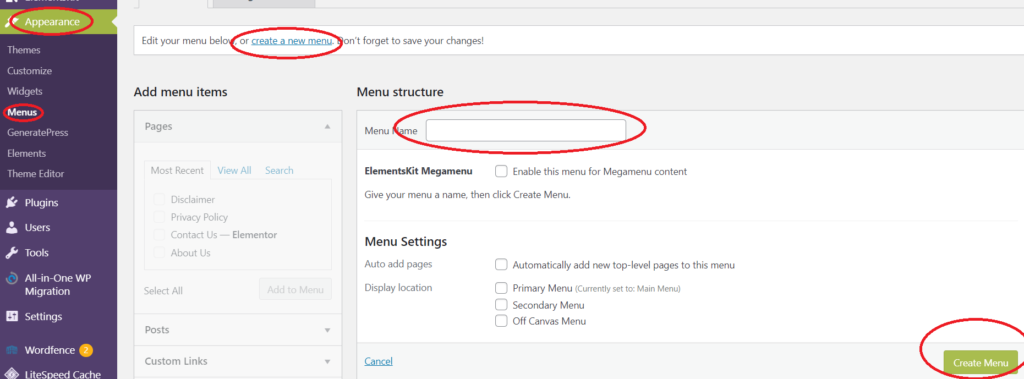
Once you click on menu, you will need to create a Menu, click on Create a New Menu. Then give the menu name and then click on Create Menu.
Once you create a menu, you will need to add Page or Post in your menu, as per below image.
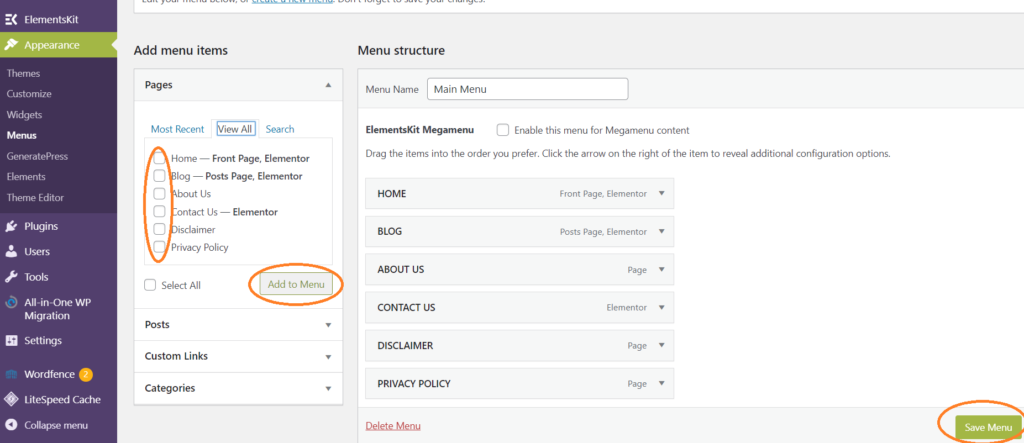
Here you can see all the post and pages you have created already and you can add them by ticking mark in each page or post as per your requirement.
On the right side will be shown as your menu once added and at last you can save menu.
once its done, you can see your website menu like below.

Here you can change the order of each item on menu by just dragging up and down with the help of mouse.
You can create a sub menu too, if you have more options on pages or post or on product too, but it can be covered in the upcoming blogs, as this blog is for only “How to create a Website” with some easy methods.
Conclusion
This blog explains How you create a Website, with little knowledge too, if you are on the starting stage of your Digital Marketing Journey.
Hope you liked it and share to the other persons too, where they can learn easily how to create a website.
It will be a pleasure to have some words from you inform of comments.
For more information, which you think is missed in this post you can contact us, we will include it here.
That’s the best way, you explained..
Great job buddy..it helps a lot to beginners…
Thank you Sir.